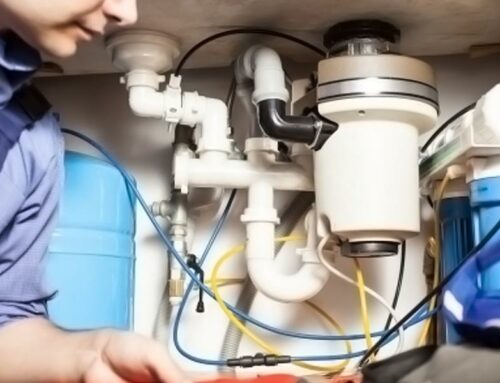
Accidents happen, and when a glass item finds its way into the garbage disposal, it can be a cause for concern. However, handling this situation carefully is crucial to prevent damage to your disposal unit and ensure the safety of your plumbing. In this guide, we’ll walk you through the steps to safely and effectively remove small pieces of broken glass from your garbage disposal.
Turn Off the Power: Safety First
Before attempting to remove any broken glass from your garbage disposal, ensure the power is completely turned off. Locate the power switch or unplug the disposal unit from the electrical outlet. This precautionary measure prevents any accidental activation while you’re working on it.
Put on Protective Gear
Broken glass can be sharp, so it’s essential to protect yourself. Wear heavy-duty gloves to safeguard your hands from potential cuts and scrapes. Additionally, consider wearing safety goggles to protect your eyes from any glass particles that may be dislodged during the removal process.
Inspect the Disposal Cautiously
Once you’ve ensured the power is off and you’re properly protected, take a careful look into the disposal. Use a flashlight to get a clear view of the interior. Identify the location of the broken glass and assess the size and extent of the pieces.
Retrieve Larger Pieces with Pliers
If there are larger pieces of broken glass visible, use a pair of pliers to carefully reach into the disposal and extract them. Grasp each piece firmly and pull it out gently. Be cautious not to force the glass or apply excessive pressure, as this could lead to further damage.
Use Tongs or Tweezers for Smaller Fragments
For smaller glass fragments that may be harder to reach with pliers, employ a pair of long-handled kitchen tongs or tweezers. Slowly maneuver the tool into the disposal, grasp the glass carefully, and pull it out. Take your time to ensure you collect all visible pieces.
Flush the Disposal with Cold Water
After removing the visible glass, it’s essential to flush the disposal thoroughly with cold water. Turn on the faucet and let the water run for a few minutes to help wash away any remaining glass particles. Cold water is preferable because it helps solidify any grease or food residues, making it easier to flush them out.
Run the Disposal with Ice
To further clean the disposal and dislodge any tiny glass particles that may be lingering, run the unit with ice cubes. Drop a handful of ice cubes into the disposal, turn it on, and let the ice grind against the impeller blades. This action helps clean the disposal and ensures any residual glass is removed.
Inspect Again and Repeat if Necessary
After running the disposal with ice, inspect the unit again with a flashlight to confirm that all glass fragments have been removed. If you still spot any remaining pieces, repeat the process until the disposal is clear.
Restore Power and Test the Disposal
Once you’re confident that all glass has been removed, restore power to the disposal. Test it briefly by running water and allowing the disposal to operate. Listen for any unusual noises or signs of resistance, as these could indicate lingering glass or damage.
Monitor the Disposal
In the days following the glass removal, keep a close eye on the disposal’s performance. If you notice any unusual sounds, odors, or issues, it’s advisable to contact a professional plumber for a more in-depth inspection.
Your Safety and Your Disposal’s Well-being
Handling a broken glass situation in your garbage disposal requires patience, caution, and the right tools. By following these steps, you can safely remove small pieces of broken glass from your disposal without causing further damage. However, if you encounter difficulties or have concerns about the condition of your disposal, don’t hesitate to reach out to a professional plumber for expert assistance. Remember, your safety and the well-being of your plumbing should always be the top priorities.